
| Home
| Photography Home | Formulae
|
![]()
Hand Colouring Black & White prints - A Rough Guide.
| My own preference is to selectively bleach
and tone areas, painting the bleach on with a small brush, carefully.
Using a range of toners it is possible to create a wide range of colours,
browns, reds, blues etc. I use a combination of toning, colour-couplers
and hand colouring using 'Photocolor' retouching dyes. 1. Select a good print, plenty of tones etc. Start by using RC papers for speed. 2. For hair & flesh tones selectively bleach the area. I prefer to bleach the area free-hand using a variety of brushes, and a Potassium Ferricyanide / Potassium bromide bleach. Paint-on water resistant masking materials may be used. If / when you make a mistake it is possible to wash, redevelop the area and start again ! 3. Wash well then sepia tone, using a Thiourea based toner. 4. Finally for the flesh tones Gold-tone the relevant sepia toned area. It is important to experiment with different sepia toners to achieve the required result. 5. Blue toners are achieved using an Iron toner again painted on by hand or by selective bleaching or by redeveloping in acolour developer with a blue colour coupler added. 6. Areas to be hand tinted should preferably be sepia toned first, ideal dyes include the Photocolor retouching kit but others are suitable. 7. It is preferable that any colours 'painted on' should be fully absorbed into the emulsion and be undetectable. 8. An alternative approach is to replace or augment the B&W image with chromogenic colour dyes. This is done by bleaching the image and re-developing in a simple colour developer with the apprpriate dye-coupler added. Tetenal make a kit based around this process. In the USA there is a habit of painting oil paint, water colours and other materials on top of the emulsion. Unfortunately this usually looks terrible and far better hand colouring took place 100 years ago.At the end of the day it is up to you. I only worked with Ilford Multigrade, Agfa Portriga Speed and Record Rapid papers. Different papers, developer & toner combinations will yield very different results. You must experiment for yourself, use scrap prints! Using methods like this it is possible to turn a B&W photograph into an image that will easily be mistaken as being shot on colour film. and printed on colour paper. |
 Evette |
   |
 Vana |
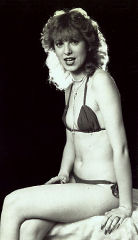
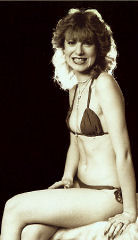
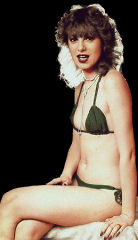
This page aims to give you ideas
as to where to make a start, there a many differentb options. The
three images above (click on them for alrger) were produced during
a demonstration lecture I gave a quite few years ago the first is
al B&W, the second has been sepia toned
and the third has been gold toned then hand coloured using Photocolor
dyes. None of these prints are perfect but they do indicate what
can be achieved. The final image took less than half an hour.
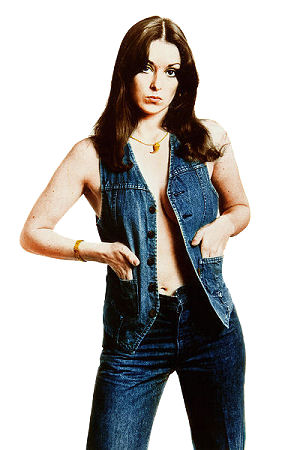
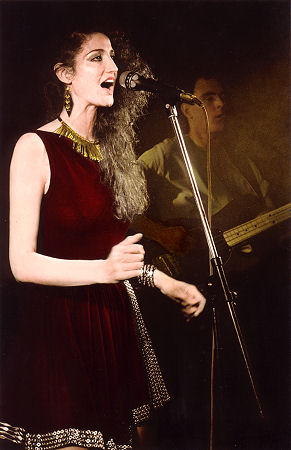
The image of Evette (top right) was part of a series made in the late 1970's, this was selectively sepia and gold toned, and then selectively blue toned, the image of Vana Verouti (right) was from a series of images produce of rock bans some years ago, the image was sepia toned selectively gold toned then hand coloured with Photocolour dyes. The best technical book on the subject of hand colouring is: PAINTED LADIES, The art of hand-colouring in photography James Wedge 1988 published in England. The best examples of hand toned & coloured images
are to be found in the late Bob Carlos Clarke's book: |
|
© Ian Grant 1992/2010 |
|
|
|
|
![]()